Monday, 31 October 2011

Independent Practice Week7:Interior Designs Part 3

The next room that i will design is the gravity room and from the research the room is very limited and is padded to stop the people in the rooms being affected by objects and referring to Dragonball Z when gravity rooms are mentioned, the room in that story is very simple and just has a centre machine controlling the gravity of the room.

I also looked at Dead Space which the room is limited to the walls that contain it and also looking at gravity rooms for astronauts which simple enough to prevent the astronauts being hurt.
So from the research i took away that the gravity room is simple to prevent the people that are in them from being hurt by objects, a centre controller allows one way to changing settings. I began to design the room with corner mounts which contain the gravity settings in the room, then had sketched a centre controller allowing same distance of access throughout the room and finally the way of entry to the room via the corridor.
Here is the whereabouts of the gravity room which is placed at the back of the ship to not be affected by attacks to the ship which could affect the ships overall gravity.
For the next room i researched into medical and toilet rooms and came across few but impressive visualisations of room in space. As the rooms consist of limited amounts of objects as most of them are placed within draws. The toilet rooms are very small but enough in size to allow a normal person to use and all of the areas of the rooms are smooth or shaped to form along the rooms shape.


So from the research i started to develop a design in which for the toilet area there would be cubicles to allow anyone to use. For the medical room i use much of the room as an area which keeps its equipment and objects inside of compartments. Also the medical room has an operating table, cat scan machine as well as the before mentioned compartments and i wanted this room to not resemble too much of a current medical room but more of a futuristic medic room which would not have equipment lying around the room.
Here is the whereabouts of the medical and toilet rooms which are place just below the main deck allowing quick and easy access.


This room is the supply room which carries on as the cargo room did with two floors of separated rooms which are filled with small and large supplies. The rooms have compartments allowing the supplies to be stored giving more room for more supplies hence why the room has large areas within the room. Being accessed via the corridors the room are separated and filled with various supplies from equipment, to machinery and small objects such as clothing.

Here is the whereabouts of the supply rooms which are placed just ahead of the back of the ship.


The next room was designed as the weaponry rooms as once again i separated the larger weaponry from the smaller weaponry. The reason for this is to give more of standard of the rooms and giving the small weaponry the chance to be used and the large weaponry as back up. Accessed via the corridors the rooms are used for battles against rival pirates and enemies when searching for treasure.


Here is the where abouts of the weaponry room which is placed just about mid ship region allowing range to cover equal distance from middle to top or bottom also having the weaponry on both sides of the ship give it better protection and to cover the front region of the ship.

Independent Practice Week7:Interior Designs Part 2

The next room i will be focusing on is the crews room where i will have hibernation pods, which will be used during long journeys. So i researched hibernation pods but the hibernation pod design i had wanted to use as a base is the one from Futurama as it's a simple design but i came across multiple designs that fit the continuity of smooth circular objects when i found pods in a circle, in a line and formed around the room.

I also looked at crews cabins in a standard ship as their wasn't much of crews cabins in a spaceship but in the standard ship the crews rooms are very tight and usually forming around the ships shape and using the metal exterior of the ship as a basis to have wooden fixtures.

So from the research i developed a four set room which is symmetrical on the right side of the ship and uses the corridor as a form of entry. In the top rooms i designed the hibernation pods to be rounded and up against thee wall to hide wiring and then next set of pods and individual controllers to be placed next to each other, with an overall controller at the back of the room as well as compartments for clothing. The bottom floor is more of a living area having food compartments, t.v., seating and areas for their objects such as books. But at the front of the room would be the individual bunkers to allow the crew members sleep in the standard sleeping times.
Here is the whereabouts of the crews room in the ship as it is placed just ahead of the back of the ship, under the captains quarters.
The next room i researched into was the engine room and i found that the room consists of large machinery, which are formed by huge wheels connected to pipes and bolts and other bits of machinery. I also looked at what would control this huge machinery and found that a long large box controllers and monitors the large machinery via dials. The machinery itself would take up much of the room leaving small areas for the engines controllers and monitors to be placed within.

The room basically followed on from the researched images by having a large engine consuming the centre of the room and manifesting into the walls of the room to transfer power to the ship. Above the large engine is the engine controls which form around the elevator which is the only means of entry to the room as well as leaving the room.
Here is the whereabouts of the engine room which is placed just ahead of the lower sales taking the energy from the sails and powering the ship.
The next room i researched into was the generator room and again similar to the engine room the room consists of large machinery which are the focal point of the room, leaving the other areas of the room to be small machines to control and monitor the generator. I found that the generator room was very limited in the amounts of machinery that were visible and so your attention would only focus on the large machine because of it.

Once i had done my research i started to develop the interior for the generator room , by again having a large piece of machinery form in the centre of the room. But i wanted to create a design which would g across the room leaving very little amount of free space as the topp area of the room would be used for monitoring the generator and controlling it.


Here is the whereabouts of the generator room which is placed at the back of the ship to allow protection of the back up power during battles.

Monday, 24 October 2011

Independent Practice Week6:Interior Designs Part 1

As i mentioned in previous blog posts i needed to add colour for the ship before i could finish off the scenes but as soon as i had finished off the turnarounds and was set on the choice that i would go with i started to think that maybe it would be better if i got all the sketches drawn out that way i would be better suited if i was in the mindset of colours and hows certain colour would work together.

So i decided to go ahead and get the interiors sketched out but first i researched into what is in the room of the captain, the captains quarters. Looking at the images the room is either consisted of a work space or living area or sometimes both as the room consists of a desk, seating and the usual living appliances.
So from the research i went with the mixture of both living and work area as the room is very large and i use this to my advantage by placing the work space under the top floor where the bed, small desk, cabinets and wardrobe are.

But the lower portion consists of a large t.v, book cases, food compartments on the wall, a way to get from base floor to top floor, seating and the work area under the top floor.


Here is the image of the whereabouts of the ship, which is the top right corner at the back of the ship.
The next room interior is the cargo room and as you can see it is split into four areas the top floor being the small cargo areas and the bottom being the larger cargo holds, with the middle sections of both floors being the access points via corridors.

From within the room you can see various shapes which represent cargo of  all sizes and how they are placed within these rooms is via the cargo doors on the floor of the rooms which small cargo would be picked up through the large doors, then through the small doors to be placed within the room.
Here is the whereabouts of the cargo rooms, which is placed in the base of the ship allowing cargo to be picked up from and go right up into the rooms.

For my next interior i researched into control rooms and seating designs and from the images you realise a limited amount of colour as shading is utilised to form the outlook of the room.

The designs of the rooms are very slick, clean and show that sense smooth visuals which would be expected from advanced technology. The room itself consists of monitors, seating and technology based equipment.

For the seating i researched into unique designs because they seem like a way of the future, a design which would fit into a time period where designs are unknown. The shape of the seating fits within the surroundings it is placed within such as a smooth shaped chair would best suit a smooth looking room rather than a cube shaped room.
So i used the research towards my design by creating a smooth clean looking design, using curves to shape aorund the room and with this look it gives a unique outlook throughout the rooms and a design which is unfamiliar. The room consists of two floors on each side, with the control panels, technology and food compartments are and the top floorwhich would be the captain's floor where he would command the crew, bellowing out instructions. The large rainbow like shapes are part of the entrances to the middle floors where as the base floor would utilise the corridoors.
Here is the whereabout os the control room which would be place in the front area of the ship given itsel an outlook in the direction it is travelling.

Independent Practice Week6:Spaceship Turnaround in Colour

I started adding colour to my crash site scene and soon realised that i could not complete the scene as didn't know what type of colours would be place upon the ship and so i had to go back to the turnaround and do a few colour tests.

So i started with an overall look of wanting the ship to use the gray scale to showcase metal which would take up most of the ships design but also adding the darker shade of red to be used as the glass portions of the ship.

For the sails i went with a light shade of brown to show how the sails will be see through and will benefit from this when closed.
For the next colour design for the ship is utilising only two colours blue and grey which are used in contrasting areas of the ship. I wanted this colour design to be limited in the colour department so that it comes across that the ship uses this to it's advantage within space. Again i used a lighter shade of blue for the sails to show how the sails will be see through and will benefit from being see through so that when closed the ship can go into a hidden state as the colours will blend into the setting of space.

For the final colour design i did some research into rusty, old ships and came across the consistent colour palette that is seen across all images, which vary between the orange to brown scale. Again the images have a contrast of those two colours showing the rust coming down around the ship with minimum amount of paint left from the previous state.
Using the small research i was able to use the two colour scales of orange of brown to the pint where the whole ship is covered in a brown metal look, where rust has formed in certain areas of the ship. The reason for rust to be placed on the ship is to make the pirates look like their near the poverty side of society and using treasure hunting to get back into a normal society. Once again i used a lighter shade of blue for the sails to show how the sails will be see through and will benefit from being see through so that when closed the ship can go into a hidden state as the colours will blend into the setting of space.

Independent Practice Week6:Tom's Character Designs

Now i also stated in my statement of intent that i would produce character designs for Tom's project and here is the character sheet he had filled out for me:Now i also stated in my statement of intent that i would produce character designs for Tom's project and here is the character sheet he had filled out for me:

Charcter Sheet Brief For Ifraz
Brief – Character Sheet


Name: N/A


Physical Description
I want the character to be simple shapes but want him to be a wacky design, one which can be easily modified to suit a range of environments. I want the character to be loaded with a weapon depending on the environment, so yeah its pretty open as to what you design. Anything from a onion on a Skateboard.


Character Traits


I want the character to be adventurous, daring, energetic, wacky, childish, fearless, loveable, humorous, and unorthodox. He's not a thinker, more of a action type, he dose not think about the consequences. Whilst there are things he is scared of, he’s not afraid to over come these problems.


Family Background


The character has no relevant family in current time, however he meets with some of his ancestors on the levels.


Education
Has little to no Education, can barely speak and read.


Habits / Vices
He has bad and rude habits such a belching, not saying manners and picking his nose and others.


Personality
Has a very fun and caring personality, he can be immature and rude and naughty at times but deep down he is a loveable and likeable.


Dislikes
Bad weather, nights and having to go to sleep, he hates creepy crawlies, is afraid of heights and been alone.


What is their Goal?
There goal is to save the current world from disaster.


Their plan to achieve Goal
To go back in time and to the future to collect all the lost artefact's which contains letters which most be used at the end to solve the anagram.
Reading what Tom has layed out for me he leaves the designs pretty open given more freedom designing than i had done with Chris' designs and because of that i felt unsure of what to produce because i had no guidelines to work with.

With no guidelines but something crazy and simple i looked at shapes for my research and from their just started to design characters that are simple but wacky, creating characters from disproportionated limbs to human representations.
Hoping for Tom's feedback on which of the designs he wanted or if i was going in the right direction, i was left with choosing for myself as Tom likes the designs but had personal issues to take care of.
So being left to choose from the designs i chose there designs to further develop. This was the first choice simple and had that human element as it was essentially an eyeball with limbs but having the basis of simplicity in my mind i refrained from adding excess stuff such as armour.

But i went along with the weaponry and added the eye as well as simple patterns to allow that simplicity to be transferred across from design to modelling.
The next choice was because of the human element and being able to connect to the character but also because he drawn as basic person and comes across as an anti-hero one which showcase no emotions as it has no facial design other than eyes. Again i did little development to the design as i felt simplicity would benefit for Tom as his game is aimed towards a younger audience and adding extra design to the character would take away that characters awareness. Going along with the large weapon the size of the character and side gun for weaponry the character stay pretty basic and comes across as a like able character.
The final character design that i had done was very, very basic as i wanted this design to focus more on the character being so basic because the limbs are like the movie 'Flubber' where the character can shape itself into anything and that is what i see this characters limbs as being and it fits with what Tom wants a basic character design with it's round shell which in defense or quick movement can go into it's shell or in attack mode would shape it's limbs into a weapon.

Monday, 17 October 2011

Independent Practice Week5:Chris' Insect Designs

As i mentioned in the previous blog post during the intrim crit Chris had wanted me to do some more designs of the insect characters of more towards stages of mutations of the characters starting with small mutations.

So i designed a character fitting Chris' description of skinny, small mutated character and by doing this i followed the usual character design but creating a thinner shape of the body which would then have sketches of mutations forming over areas of the body.
The next design would be the medium mutated character which his body would have an increase of body mass as well as mutations which are much more noticeable.
As well as increase in body mass and mutations i wanted to get across the fact that these mutations are stripping the characters humanity as he mutates further.
This had meant to be the final character being the large boss character and i had designed the character fitting with Chris' description of large body mass and larger mutations but after sending the design over Chris didn't see the design as a boss but more of a medium design.
So after the unsuccessful attempt at a large boss like insect character design Chris told me to look at Batman's Bane specifically from the 2008 game Batman:Arkham Asylum, as well as the build of professional wrestle Dave Bautista and also for the character to be around seven foot.
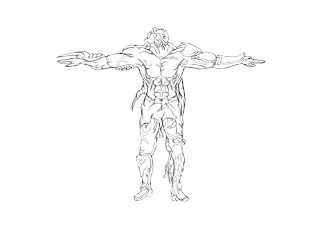
So after giving me the specific bits of research i created a design similar to all the areas that Chris covered in the research and with this design i wanted to get across that the mutations haven't given the character a disadvantage but rather and advantage with the tough exterior of a beetle covering areas of his limbs as armour or pincers to attack with, this character looks more menacing than the previous design.
Now with this final image that looks unchanged from teh previous image but once again after sending over the previous design Chris mentioned the proportion of the head being too small so i went back and inflated the head of the character to a suitable size but have to think more about looking at my designs' proportion as this problem has come up multiple times.

Independent Practice Week5:Chris' Battle Poses

During the intrim crit Chris stated that he may need me to design a few battles poses and more insect character designs and so here are the three battle poses for the main character basing the poses off of the three images you see below. The first thing that i had to do was form the body shape of the pose to which i would then use the body shape as an outline for the main character.


After sending the poses over to Chris via email he responded with "these are great the second is the best, i do like the third one but the other hand should be further up the gun holding it underneath" and with Chris liking the designs but going towards the second which i feel fits better with his main characters design and as Chris mention with the third design the positioning of the hand is off so another point added to proportions for me to focus more on when designing.

Independent Practice Week5:Intrim Crit

This week was the intrim crit, going into the crit i was pretty confident that with the quality and quantity of work was sufficient for this time and asking the tutors what should i be expecting to produce for the crit and also with the presentation done and notes for the slides done my confidence was great, i was prepared. But once the presentation started i had barely read a full sentence from the notes and went through my slides very quickly but at the end i was still with what i had and would produce and here are the notes that were taken by the tutor that were about improving and what i could do
  • Photoshop skills enhance
  • Backstory-Solidify-When is this set?-On What Planet?-Earth-Location of Crash?
  • Isometric Floor Plan-Scale
  • Characters-How many?
  • Blog posts
-I feel my photoshop skils are enhancing as i realise new tools but i was made aware that Photoshop isn't just a software allowing me to draw but rather to speed up the process for example i would paint the background of space but with Photoshop i could quickly use the gradient tool to create a contrasting background and work from their.

-I had not really gone into much detail of the whereabouts and time that my story is placed but after thorough research i feel that basing my story within the time frame of the 1500s would fit well with the spaceship basing their design off of the Carrack as the Carrack was seen as 'the' ship to base future ships off of as it was strong, allowed large amounts of cargo and people and the structure of the sails allowed additional speed. As for the whereabouts i found an unexplored region of Earth's Amazon Rainforest primarily the Amazon Baain of South America and the reason i chose this is due to the crew that encompass the spaceship are an advanced race from a planet called shinde which have been studying the human race and have furthered their knowledge based off of human kind and from their obsession of Earth much of their advanced technology is based off of Earth's objects of the time. The reason the Amazon Basin was chosen is due to it being unexplored within the time period my main character comes across this ship from a distance because the area where the ship had crashed was unexplored many others that had come across the ship from a distance didn't want to risk the journey to the ship but the main character was the exception.

-I have redone the scale of ship and updated the images in the blog post and will do a blog post going to the specific room of the ship that will be further developed through Maya in my next project.

-The characters side of the project wasn't really an objective but after designing a few i started to think of a minimum of ten characters including the main character but that i would only focus on the environment/spaceship side of the project. The reason for this is because after doing character designs in the modelling aspect i wasn't too skilled and found the end product not really reflecting very well although i will go further into environmetal design i will if their is time to do more character design.

-With blog posts i am up to the intrim crit date.

Overall i was confident before, during and after the intrim crit as i was on the right path and only had few things to touch up on and can start working on the colour side of my scenes, here is an image of where im at:

Monday, 10 October 2011

Independent Practice Week4:Chris' Choices Turnaround

With a few days till the intrim crit i am pretty confident that what i have done so far is enough to show and so i took another 'breath of fresh air' when Chris asked me to do a turnaround for two of the character designs that i had done for him. Happy that two design that i had done was chosen for his project i went further into development producing side and back views to the previous front views that i had done.


Starting with the simplest of the two choices i went ahead and produced the back then the side views but leaving a blank spot for the controlling insect as i was unaware of the choice of insect i was going with. So as the design for the character was pretty simple i had done the side and back view pretty quickly and went on to work on the insect design and looking back at the insect from my research there wasn't many options to choose from that was thinking for the design but what had stood out was the beetle. The beetle had to be the choice of the controller as it looks menacing, powerful and a fitting insect that could overpower and wrap its legs around the character to do its bidding. So i went on to choose the beetle and once again do a turnaround of the insect so that Chris would be able to take the design and model the insect but with the design i made sure that the look of the back of the insect looked tough so that it would be hard to take the insect off of the character. Once i had the turnaround of the insect complete i started to place the insect on the front, side and back of the character and wrap the legs of the insect around the characters neck to give the viewer the knowledge that this character is being controlled and the veins being larger and showing up on the character as the insect is starting to mutate the character.


The other character design that Chris had chosen to go with is one of the main character designs that i had done although the image shows the design of the main character the original face design was different as Chris had wanted the facial design of one of the other character designs. So after placing the new facial design upon the chosen body design, i knew that doing the full turnaround of the character would take much longer as the design has much more detail. Doing the back view first forming the design from the front view i finished off the back view by adding a backpack, inventory design to show how the character is breathing, where he gets his equipment and just a design that would be used as an all round purpose item. After i had done the back view i can then start to work on the side view as the frn and back views allow me to join the two sets of views and give the design a connection point where everything goes together.

Overall i believe the turnaround design came out brilliantly, doing a turnaroung for the insect was great to do because its apart of the design as an individual object which makes up the character design as a whole. But by far my favourite had to be the turnaround of the main character as i feel from the front view you don't get across certain areas of the design and their purpose and i feel at the end being able to do the turnaround of the character i was able to further develop a design which looks better and understanding from different views. Also after showing Chris the designs and being updated on his progress of cleaning up the design he told me that certain proportions were messed up, so that is an area of skill that i would need to work on.